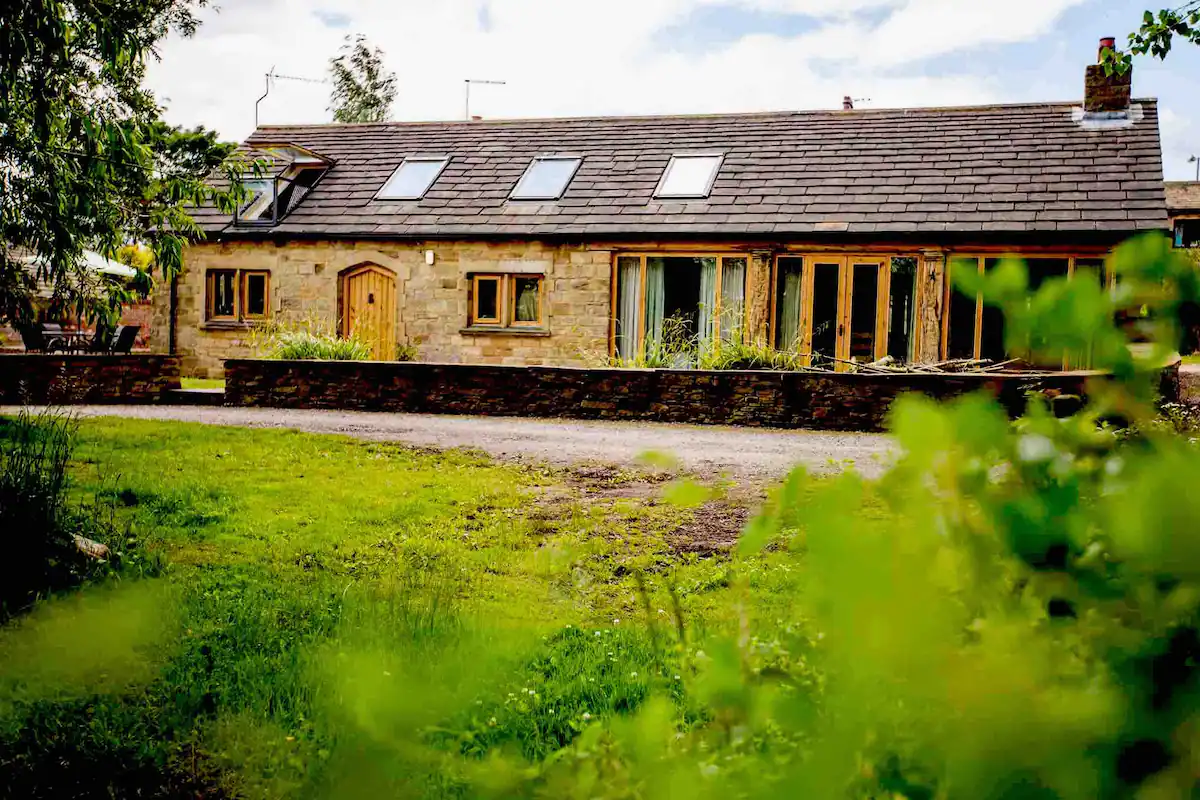
HOW TO: Import User Profile Information of Enabled User Accounts

April 16, 2008 · Posted by MYCOMPANY\Administrator
0 Comments· 0 Links to this post

This article describes how to import user profile information of enabled user accounts from Active Directory directory services to Microsoft Office SharePoint Portal Server 2003.

You configure import settings for user profiles that you want to import on the Configure Profile Import page of SharePoint Central Administration. SharePoint Portal Server uses the (&(objectCategory=person)(objectClass=user)) LDAP search filter and user profile information of all user accounts in Active Directory are imported to SharePoint Portal Server. This filter imports all enabled and disabled user accounts to SharePoint Portal Server.

You can filter the user profile information that you want to import from Active Directory by adding query clauses to the LDAP search filter in the User filter box in the Search Settings area of the Configure Profile Import page.

To import user profile information of only user accounts that are enabled, use the (&(objectCategory=person)(objectClass=user)( !(userAccountControl:1.2.840.113556.1.4.803:=2))) LDAP search filter.

Import User Profile Information of Enabled User Accounts from Active Directory to SharePoint Portal Server

To import user profile information of user accounts that are enabled in Active Directory to SharePoint Portal Server, follow these steps:

1.On the Site Settings page of the portal site, on the User Profile, Audiences, and Personal Sites page, click Manage profile database.

2.On the Manage Profile Database page, click Configure profile import.

3.On the Configure Profile Import page, in the Source area, click Custom source.

4.In the Access Account area, type the user account name and password of the user account that has appropriate permissions to access Active Directory.

5.In the Full Import Schedule area, click to select the Schedule full import check box, and then specify the full import schedule that you want.

6.In the Incremental Import Schedule area, click to select the Schedule incremental import check box, and then specify the incremental import schedule that you want.
Note If the Schedule incremental import option is not available (appears dimmed), click to select the Import from Active Directory by using the incremental method check box in the Source area.
Important To perform incremental imports for Microsoft Windows 2000 Server Active Directory, the user account that you use to perform the import operation must have the Replicating Directory Changes permission. This permission is not required to perform incremental imports for Microsoft Windows Server 2003 Active Directory. To assign the Replicating Directory Changes permission to the user account that you use to perform the import operation, follow these steps:

a.Start Active Directory Users and Computers.

b.On the View menu, click Advanced Features.

c. Right-click the domain object, and then click Properties.

d. Click the Security tab.

e. In the Group or user names list, click the user account that you want to use to perform the import operation.
If the user account is not displayed in the list, click Add, type the name of the user who you want to add, and then click OK.

f. In the Permissions for UserName list, click to select the Allow check box next to the Replicating Directory Changes permission, and then click OK.

7.Click OK.

8.On the Manage Connections page, do one of the following as appropriate to your situation:

•Click the name of the domain that you want to edit, and then click Edit.
-or-

•Click New connection to add a new domain controller that contains the user profiles that you want to import.

9.On the Edit Connection or Add Connection page (as appropriate to your situation), in the Search Settings area, do the following:

a.In the Search base box, type the distinguished name (DN) of the Active Directory object from where you want to import the user profiles.
The DN of the search base object defines the location in Active Directory where you want to start your search. The following are examples of DNs:

•DC=DomainName, DC=com

•CN=Users, DC=DomainName, DC=com

•OU=OrganizationalUnit, DC=DomainName, DC=com

b. In the User filter box, type the following LDAP search filter:

(&(objectCategory=person)(objectClass=user)( !(userAccountControl:1.2.840.113556.1.4.803:=2)))

c. Under Scope, specify the scope level, page size, and page time-out options that you want.

10.Click OK.


REFERENCES

For more information about how to write LDAP search filters, visit the following Microsoft Web site:

http://msdn2.microsoft.com/en-us/library/ms180883(vs.80).aspx (http://msdn2.microsoft.com/en-us/library/ms180883(vs.80).aspx)

For more information about LDAP search filters, see Request for Comments (RFC) 2254. To do so, visit the following Internet Engineering Task Force (IETF) Web site:

http://www.ietf.org/rfc/rfc2254.txt?number=2254 (http://www.ietf.org/rfc/rfc2254.txt?number=2254)


Source

Tags:


How to set restrictions on a site collection

December 18, 2007 · Posted by MYCOMPANY\Administrator
0 Comments· 0 Links to this post

With Office Server SP1 out now, it looks like we will see a lot security features updates like this one.

This article describes how to set restrictions on a site collection on a computer that is running Microsoft Office SharePoint Server 2007 Service Pack 1 (SP1). The article discusses how to allow access only for users in a particular organizational unit (OU).

Administrators can use the stsadm.exe command to set restrictions on a site collection to allow access only for users in a particular OU. To do this, follow these steps:

1. Click Start, click Run, type cmd, and then click OK.

2.At the command prompt, type the following command, and then press ENTER:

cd /d %programfiles% \Common Files\Microsoft Shared\Web Server Extensions\12\BIN

3.At the command prompt, type the following command, and then press ENTER:

stsadm.exe –o setsiteuseraccountdirectorypath –url site collection url -path OU path

For example, type the following at the command prompt:

setsiteuseraccountdirectorypath –url http://server/sites/s1 -path "OU=MSCRM,DC=redmond,DC=corp,DC=microsoft,DC=com"

Note The path will be the full distinguished name of the OU. The command will set the restrictions to allow only users under "OU=MSCRM,DC=redmond,DC=corp,DC=microsoft,DC=com" to be added to the site collection http://server/sites/s1.

To obtain the OU path, type the following at the command prompt, and then press ENTER:

stsadm.exe –o getsiteuseraccountdirectorypath –url site collection url

When the administrator uses the Stsadm.exe tool or another management tool to manage the site collection, the administrator will be added as a user to the site collection. The command in step 3 will block the administrator from managing the site collection if the administrator does not belong to the OU. To enable the administrator to manage the site collection, type the following at the command prompt, and then press ENTER:

stsadm.exe -o setproperty -url webappurl -pn "peoplepicker-serviceaccountdirectorypaths" -pv paths

Note In this command, paths is a placeholder for a semicolon-separated list of distinguished names.
To see the list of allowed administrator directory paths, type the following at the command prompt, and then press ENTER:

stsadm.exe -o getproperty -url webappurl -pn "peoplepicker-serviceaccountdirectorypaths"

Related KB

Tags:


QOD: Can you audit permission changes?

December 14, 2007 · Posted by MYCOMPANY\Administrator
0 Comments· 0 Links to this post

Question: Can you audit permission changes in a site collection?

Answer: This is possible, but by default security changes are not audited. To enable auditing:

  1. Select Site Actions + Site Settings + Modify All Site Settings at the site collection root site.
  2. Click the Site collection audit settings link.
  3. Select the Editing users and permissions option:

Audit1

Once turned on, changes to permissions on sites, lists and items will be audited. To view the audit log:

  1. Click the Audit log reports link on the “Site Settings” page for the site collection.
  2. Click the Security Settings link:

Audit2

This will open the audit log in an Excel spreadsheet. The following example shows a summary showing a single security change resulting from a breaking of permission inheritance:

Audit3

More detailed information is available in the “Report Data” sheet in the Excel workbook.

Source

Tags:


HowTo: Create Site Collections with Create Site

November 20, 2007 · Posted by MYCOMPANY\Administrator
0 Comments· 0 Links to this post

If you want to create site collections using create site button, you need to do the following:

  1. Enable Self Service Site Creation in Central Administration
  2. Change behavior of the Create Site button on Site Directory

Enable Self Service Site Creation in Central Administration

  1. Open the Central Administration site

  2. Click Application Management

  3. Click Self-service site management

  4. Select the correct web application (that step is easy to miss)

  5. Select On for Enable Self-Service Site Creation and click Ok.

Change behavior of the Create Site button on Site Directory

  1. From the portal, use the Site Actions menu, select Modify All Site Settings. If you are not on top level site you will need to go to Top Level Site Settings.

  2. Under site collection administration, select Site Directory Settings.

  3. Select the checkbox to create new site collections from sites directory.

Thanks to Mark

Tags:


Friday Video: Fix IE User Logon Prompt

November 16, 2007 · Posted by MYCOMPANY\Administrator
0 Comments· 0 Links to this post

Tags:


HowTo: Index Office 2007 files on SPS 2003

November 12, 2007 · Posted by MYCOMPANY\Administrator
0 Comments· 0 Links to this post

You upload a document or a file that was created by using the 2007 Microsoft Office system to a Microsoft Office SharePoint Portal Server 2003 Web site. When you do this, SharePoint Portal Server cannot index the 2007 Office document or file.

This issue occurs because the 2007 Office iFilters are not included in SharePoint Portal Server 2003. Therefore, the following 2007 Office file formats are not indexed by SharePoint Portal Server 2003:

•.docx

•.docm

•.pptx

•.pptm

•.xlsx

•.xlsm

To resolve this issue, install a 2007 Office program, such as Microsoft Office Word 2007, on the computer that is running SharePoint Portal Server. By default, this procedure also installs the 2007 Office iFilters. To do this, follow these steps:

1.Install Word 2007 on the computer that is running SharePoint Portal Server.

2.Click Start, point to Administrative Tools, and then click SharePoint Central Administration.

3.On the SharePoint Portal Server Site Settings page, click Configure search and indexing in the Search Settings and Indexed Content section.

4.On the Configure Search and Indexing page, click Include file types in the General Content Settings and Indexing Status section.

5.On the Specify File Types to Include page, click New File Type.

6.On the Add File Type page, type the file name extension for the file type that you want to add in the File extension box. The 2007 Office system uses the following file name extensions:

•.docx

•.docm

•.pptx

•.pptm

•.xlsx

•.xlsm

7.Click OK.

KB Article 944445

Tags:


CLI: Unextend / Extend Web Application

November 3, 2007 · Posted by MYCOMPANY\Administrator
0 Comments· 0 Links to this post

If you want to unextend (delete) your SharePoint site, this is an easier way to do it, blogged earlier.

STSADM.exe -o unextendvs -url http://%computername% -deletecontent -deleteiissites

Similar to this is the extend script.

 STSADM.exe -o extendvs -sethostheader -url http://%computername% -apcreatenew -apidtype NetworkService -apidname SharePointSite -ownerlogin domain\username -owneremail someone@justsharepoint.com -lcid 1033 -sitetemplate STS#0 -exclusivelyusentlm

If you want Kerberos instead of NTLM, change the last parameter in the script to negotiate. Ignore warnings at your risk, but you do need to refer to the KB mentioned in the warning for additional steps that will be required to be carried out by your systems administrator.

You can find the scripts on my skydrive.

Tags:


HowTo: SlipStream WSS and MOSS Security Updates

October 10, 2007 · Posted by MYCOMPANY\Administrator
0 Comments· 0 Links to this post

Microsoft have released an important security bulletin for Windows SharePoint Services v3 and MOSS 2007 - MS07-059.

HowTo for MOSS 2007

Download Security Update to a C:\Downloads\SharePoint

Run this command from the cmd prompt (Assuming your moss installation files are copied to C:\Server12)

officeserver2007-kb937832-fullfile-x86-glb.exe /extract:C:\Server12\Updates

Check C:\Server12\Updates folder to find new files!

HowTo for WSS3

Download Security Update to a C:\Downloads\SharePoint

Run this command from the cmd prompt (Assuming your moss installation files are copied to C:\WSS)

wssv3-kb934525-fullfile-x86-glb.exe /extract:C:\WSS\Updates

Tags:


New Theme?

October 9, 2007 · Posted by MYCOMPANY\Administrator
0 Comments· 0 Links to this post

This blog would love to have a premium theme. What do you think? Given the content of this blog, getting a Revolution News Theme for free in a giveaway contest would rock!

Brian Gardner is running this contest and Just SharePoint would love to win it!

Why? Well the layout is super coo yet simple. With options to have a specific advertisement block, customised logo and banner at the top, it sure would make a great theme for JustSharePoint News!

How? Well, with different categories - news for those categories would deliver exactly what you would want to read, instead of having to look around. Latest Headlines would be just that - sidenotes - so you don’t read the same content in “n” sites. In featured stories, you would read premium content.

Just love it! Brian, thanks for being so generous.

Tags:


HowTo: Display Custom Fields in CQWP

October 6, 2007 · Posted by MYCOMPANY\Administrator
0 Comments· 0 Links to this post

Over at MSDN, the team has demonstrated a howto for displaying custom fields in Content Query Web Parts.

This how-to article shows the steps for modifying the properties in the Content Query Web Part .webpart file so that the Web Part displays content type custom columns from a document library.

You can use the Content Query Web Part to display a dynamic set of items based on a query. The Content Query Web Part enables you to set presentation options that determine how items are displayed on the finished page. The items displayed by the Content Query Web Part always reflect the most current set of items retrieved by the query that the page viewer is authorized to see. The query is run whenever the page that contains the Content Query Web Part is viewed. If new content is added and it meets the query criteria, the Content Query Web Part automatically displays it. By default, the Content Query Web Part does not return all fields for items returned in a query. This visual how-to article demonstrates how to display custom fields in the Content Query Web Part by setting the CommonViewFields custom property and editing the default XSLT transformation used to render items. The steps include:

  1. Adding the Content Query Web Part to a Web page on an Office SharePoint Server 2007 site.

  2. Configuring the Content Query Web Part to work with the Project Status Reports document library and the Project Status Report content type.

  3. Exporting the Content Query Web Part to a .webpart file.

  4. Editing the exported .webpart file and setting the CommonViewFields custom property of the Content Query Web Part to request the Project Status Report content type custom fields.

  5. Editing the default XSLT transformation used by the Content Query Web Part to display the Project Status Report content type custom fields.

  6. Importing the edited .webpart file to a Web page on an Office SharePoint Server 2007 site.

  7. Configuring the imported Web Part to use the new XSL style.

For complete howto, visit here | Video of this howto

Tags:


CLI: Delete Site and it’ content

September 26, 2007 · Posted by MYCOMPANY\Administrator
0 Comments· 0 Links to this post

You can delete (unextend) a site from iis and also delete associated database using the following command line

STSADM.exe -o unextendvs -url http://%computername%:80 -deletecontent -deleteiissites

Tags:


CLI: Changing the Site Collection Administrator

September 24, 2007 · Posted by MYCOMPANY\Administrator
0 Comments· 0 Links to this post

You can change site collection administrator using the following command line

STSADM.exe -o siteowner -url http://%computername% -ownerlogin domain\domainuser

Tags:


WSS SP3: Post Installation Issues

September 21, 2007 · Posted by MYCOMPANY\Administrator
0 Comments· 0 Links to this post

Post Windows SharePoint Services Service Pack3 installation, you may 

Encounter error messages:

Exception from HRESULT: 0×80040E14.
Troubleshoot issues with Windows SharePoint Services.

HTTP 500 - Internal server error

Unable to perform the following operations:

Edit columns on a list

Import a spreadsheet

Add choices to a choice field

To resolve this, run the following command for

Windows SharePoint Services 2.0

1.Click Start, click Run, type cmd in the Open box, and then click OK.

2.At the command prompt, type the following lines, and then press ENTER after each line:

cd /d %commonprogramfiles%\Microsoft Shared\Web Server Extensions\60\Bin
stsadm -o upgrade -forceupgrade

3.Type exit to exit Command Prompt.

Windows SharePoint Services 3.0

1.Click Start, click Run, type cmd in the Open box, and then click OK.

2.At the command prompt, type the following lines, and then press ENTER after each line:

cd /d %commonprogramfiles%\Microsoft Shared\web server extensions\12\BIN
stsadm -o upgrade -forceupgrade

3.Type exit to exit Command Prompt.

Sourced from Microsoft KB 841216

Tags:


Friday Video: Enable Excel Services in SharePoint 2007

September 21, 2007 · Posted by MYCOMPANY\Administrator
0 Comments· 0 Links to this post

Tags:


Friday Video: Email enable SharePoint List

September 14, 2007 · Posted by MYCOMPANY\Administrator
0 Comments· 0 Links to this post


Tags:


HowTo: Introduction to Document Libraries

September 12, 2007 · Posted by MYCOMPANY\Administrator
0 Comments· 0 Links to this post

Tags:


Everyday Productivity Education with SharePoint

September 10, 2007 · Posted by MYCOMPANY\Administrator
0 Comments· 0 Links to this post

Tags:


Update for Windows SharePoint Services 3.0 (KB941422)

September 6, 2007 · Posted by MYCOMPANY\Administrator
0 Comments· 0 Links to this post

Microsoft has released an update for Microsoft Windows SharePoint Services 3.0. This update includes updated time zone definitions for daylight saving time (DST) start dates and end dates for New Zealand 2007. This update also includes other fixes.

Source

Tags:


Update for Windows SharePoint Services 2.0 (KB941412)

September 6, 2007 · Posted by MYCOMPANY\Administrator
0 Comments· 0 Links to this post

Microsoft has released an update for Microsoft Windows SharePoint Services 2.0. This update includes updated time zone definitions for daylight saving time (DST) start dates and end dates for New Zealand 2007. This update also includes other fixes.

Source

Tags:


HowTo: Enable and Start SQL Browser Service

August 31, 2007 · Posted by MYCOMPANY\Administrator
0 Comments· 4 Links to this post

In Sql Express 2005 installation, SQL Browser service is disabled by default.

To enable and start the sql browser service using cli (command line interface), use the following commands.

sc config sqlbrowser start= auto

net start sqlbrowser

Tags:


STSADM: Create MySite

August 27, 2007 · Posted by MYCOMPANY\Administrator
0 Comments· 10 Links to this post

To create MySite using STSADM.exe, use the following command

stsadm -o createsite -url http://servername/personal/username -ownerlogin domain\username -owneremail user@domain.com -sitetemplate SPSPERS

Note: Please do not copy paste this code. Type it in.

Tags:


SharePoint Upgrade and Migration Resources

August 17, 2007 · Posted by MYCOMPANY\Administrator
0 Comments· 0 Links to this post

Tags:


Plan for administrative and service accounts

August 15, 2007 · Posted by MYCOMPANY\Administrator
0 Comments· 0 Links to this post

The account requirements detail the specific permissions that you need to grant prior to running Setup. In some cases, additional permissions that are automatically granted by running Setup are noted in the planning tool.

This article does not describe the account requirements for using single sign-on (SSO) in Microsoft Office SharePoint Server 2007. For more information, see Plan for single sign-on .

This article does not describe security roles and permissions required to administer Office SharePoint Server 2007. For more information, see Plan for security roles (Office SharePoint Server) .

Source

Tags:


Tip: Page Editor Unavailable

August 3, 2007 · Posted by MYCOMPANY\Administrator
0 Comments· 0 Links to this post

image So you can’t edit page? Well chances are that someone has edited the page and not checked in. It’s been checked out and not published.

Navigate to Pages library on your site to to see who has this checked out this page.

Image Source | Content Source

Tags:


Tip: Recycle IIS Application Pool

July 31, 2007 · Posted by MYCOMPANY\Administrator
0 Comments· 0 Links to this post

As a developer, quite often you may have to recycle the application pool. IISReset is an option, alternatively you can just recycle a particular application pool.

Denny has a tip to just get this done!

cscript c:\windows\system32\iisapp.vbs /a “[App_Pool_Name]” /r

Source

Tags:


Fix: SQL Server Reporting issues with SharePoint

July 31, 2007 · Posted by MYCOMPANY\Administrator
0 Comments· 0 Links to this post

Situation: You have SQL Server Reporting installed and you have just installed SharePoint. You discover that your SQL Server Reporting stops working.

Piyush Mittal has documented his field experience.

Simple answer:

Using a dedicated application pool can help avoid conflict with existing Web applications.

Refer to this Microsoft article for more info.

If you install SharePoint Services after Reporting Services is already installed and configured, your Reporting Services installation will be unusable until you perform the following steps:

1. Start the Reporting Services Configuration tool.

STSADM.EXE -o addpath -url http://localhost/ReportServer -type exclusion
and
STSADM.EXE -o addpath -url http://localhost/Reports -type exclusion
By default, the Stsadm.exe file is located in C:\Program Files\Common Files\Microsoft Shared\Web server extensions\60\bin

2. Configure the Report Server virtual directories.

Check out this link to configure the directories.

Thanks Piyush.

Tags:


HowTo: Set Permissions for Comments on SharePoint Blog

July 25, 2007 · Posted by MYCOMPANY\Administrator
0 Comments· 0 Links to this post

If you want to allow your blog visitors to comment on blog posts you will need to explicitly allow them to do so. To achieve this, you will need to setup unique permissions on your blog.
Here is the procedure:
1. Open http://your_blog_url/Lists/Comments/AllComments.aspx
2. Select Settings > List settings
3. Select Permissions and Management > Permissions for this list
4. Open Actions >Edit permissions (confirm this action when dialog pops-up)


Now you can setup unique permissions for this list. From this step forward you can add permissions for a specific user. The best approach is to give the Visitors group “Contribute” rights for this entire list.

You will also need to limit user’s ability to edit and delete only his comments.
The procedure is as follows:
1. Open http://your_blog_url/Lists/Comments/AllComments.aspx
2. Select Settings > List settings
3. General Settings> Advanced Settings
4. Choose “Only their own? for Edit access option

Source

Tags:


KB Fix: My Site Creation Error

July 20, 2007 · Posted by MYCOMPANY\Administrator
0 Comments· 0 Links to this post

A user tries to create a My Site site in a portal site that has the Enable Self-Service Site Creation setting enabled in SharePoint Server 2007. However, the user cannot create the site. Instead, the user receives the following error message:

There has been an error creating the personal site. Contact your site administrator for more information.

Contact Microsoft Support for this fix.

Source: Microsoft KB

Tags:


HowTo: Change Service Accounts and their Passwords

July 18, 2007 · Posted by MYCOMPANY\Administrator
0 Comments· 0 Links to this post

How to change the Application Pool Identity of a WSS or MOSS web application

  1. Open SharePoint Central Administration, click Operations.
  2. Under Security Configuration, click Service accounts.
  3. Click the radio button beside Web application pool. Select Windows SharePoint Services Web Application. Select the application pool where you want to change the identity, for example: Sharepoint - 80.
  4. Make a note of the existing settings in case you need to unwind your changes.
  5. Select the Configurable radio button. Provide the user name and password. It helps to be explicit here and use the domain\account format (e.g. mydomain\SPService). Also be sure to use a strong password. Click OK.
  6. To restart the application pool, either open IIS and recycle the application pool, or open a command prompt and type iisreset -noforce.
  7. Open your SharePoint site in a browser to confirm that the change was successful.

This change will be automatically propagated to all web front-ends.

How to change the Application Pool Identity for SharePoint Central Administration (SCA)

Repeat these steps on each server which hosts the SharePoint Central Administration web application. If the web front-end (WFE) and application (APP) server roles are served by separate machines, SCA should be enabled on one APP server (or more) and stopped and/or removed from the WFE servers. This allows control over access to the SCA. The SCA service account should not be the same as that used for the SharePoint application pool so even if one is compromised, the other remains secure.

  1. Open a command prompt.
  2. Run: stsadm -o updatefarmcredentials -userlogin domain\username -password password
  3. Be patient. This may take a few minutes to run.
  4. To restart the application pool, either open IIS and recycle the application pool, or open a command prompt and type iisreset -noforce
  5. Open SharePoint Central Administration in a browser to confirm that the change was successful.

The above steps create an Administration Application Pool Credential Deployment timer job. You can see this in the Timer Job Definitions page. The job is complete when it no longer appears in the list of definitions (refresh the browser, this isn’t automatic).

How to change the default content access account for MOSS search

The content access account is used to crawl and index SharePoint content for a given Shared Service Provider (SSP). It should be different from the application pool identity and configured so that only the most recent version of each document is indexed, otherwise old versions will appear in search results.

  1. Open SharePoint Central Administration (SCA), and on the left below Shared Services Administration click on the Shared Service Provider with the search configuration you want to change (e.g. SharedServices1).
  2. Under Search, click Search settings. Click Default content access account.
  3. Enter the credentials, confirm the password and click OK.

How to change the Search Service account for MOSS

Note that this is the identity used to run the Search Service, it is not the identity with which content is actually crawled and indexed. This account must be a local administrator (not a domain administrator) on both the query server and the index server in order for index propagation to work. This is set automatically for you when you click OK (below), but is the first thing to verify if you get a “Query server not responding” error (see Chris Gideon’s post).

  1. Open SharePoint Central Administration, click Operations.
  2. Click Services on server, and then Office SharePoint Server Search.
  3. Configure the Farm Search Service Account. It is okay to use the same account as the SharePoint application pool identity.
  4. Scroll down and click OK.
  5. Wait while your changes are processed.

How to change the default content access account for WSS search

Note that the Search Service account (which runs the WSS search application) is not the same as the Content Access account (which actually indexes the content). The Search Service account may be the same as the SharePoint application pool identity. The Content Access account should be different from the SharePoint application pool identity.

  1. Open SharePoint Central Administration, click Operations.
  2. Click Services on server, and then Windows SharePoint Services Help Search.
  3. Configure the Service Account.
  4. Configure the Content Access Account.
  5. Scroll down and click OK.
  6. Wait while your changes are processed.

or

  1. Open a command line.
  2. Run: stsadm.exe -o spsearch -farmserviceaccount domain\username -farmservicepassword password
    It is okay to use the same account for this service as the SharePoint Application Pool identity.
  3. Run: stsadm.exe -o spsearch -farmcontentaccessaccount domain\username -farmcontentaccesspassword password
    This account should be different from the SharePoint Application Pool identity.
  4. Repeat these steps for all servers in the farm.

Source: Eli Robilliard’s World

Also Refer to:

Joel Oleson: Password change via stsadm (2006-08-22)

MSDN KB 934838: How to change the passwords for service accounts in SharePoint Server 2007 and in Windows SharePoint Services 3.0

Tags:


QOD: Navigation Breadcrumb For My Site

July 16, 2007 · Posted by MYCOMPANY\Administrator
0 Comments· 0 Links to this post

Q. I’m using Microsoft Office SharePoint Server 2007 and recently discovered there’s no easy way to navigate from My Site back to my main SharePoint intranet portal.  The navigation breadcrumb exists for other sites, but not for My Site. Can I enable this functionality for My Site?

A. This is a good question and one that I receive quite often.  If you have a single intranet portal, or one that you call your home portal, you can configure an individual My Site to include it in the breadcrumb navigation.  To do so, perform the following steps:
     1. While on your My Site, choose Site Settings, Modify All Site Settings from the Site Actions menu.
     2. From the Site Settings page, select the Portal site connection option.
     3. You’ll now see a screen that lets you specify a portal site address.
     4. Enter the URL and name of the portal site you want your My Site to be connected to, then click OK.

That’s all there is to it.  Notice, in the upper left corner of your My Site, the breadcrumb navigation bar has been updated to include a link to your portal.

Source: MSD2D

Tags:


Central Administration Remote Access

July 2, 2007 · Posted by MYCOMPANY\Administrator
0 Comments· 6 Links to this post

If you want to access your SharePoint Central Administration site remotely, it is possible to do this. Office

At the time of setting up your SharePoint installation, Central Administration site will be setup on a particular port. It won’t be on default IIS port 80.

Depending on your installation method (unattended or interactive), Central Administration port will be anything but 80.

Let’s assume the port number is 8000. In that case you will be able to access your SharePoint Central Administration site using http://%servername%:8000

Point to note: If you are accessing this site through a firewall, you will need to open up this port (8000) on your router.

Tags: